Melissa Woodruff of the Facebook group Sewing for Weavers has asked about this wrap since I posted a photo of it on the group. This is a short version of my favorite garment– a much longer wrap. I didn’t have enough of the lovely weft yarn so decided to create a somewhat different look with a shorter warp and with fancy yarn woven into the front.
This is a “low-sew” project– only three straight seams all on selvedges, so no special treatment needed. You can see the center back seam in the photo. There are two side seams that aren’t visible making sleeves. The neckline is shaped on the loom and it and the hem edges are finished with crochet. I would have hemmed the bottom but didn’t have sufficient yarn to make it long enough. This is a “one-size-fits-most” garment.
I used a ramie/cotton green yarn rescued from unraveling a thrift store sweater for the warp, sett at 8 epi, width in reed 23″. (I normally make my longer wraps at least 24″ and preferably wider, but again, lack of weft yarn dictated a narrower warp.) The main weft is Filatura di Crosa “Cambridge”, a wool/mohair blend with a nylon binder. The accent weft is “La Bohème,” which had several colors. I was disappointed to find it was composed of approx. 5 yard lengths of different yarns simply knotted together, so I cut it apart to use the kind of teal-bluish color only. The clasp is an Art Deco antique I bought at a show a long time ago.
Here is the crudely-drawn, not to scale, weaving plan. It is woven as two 44″ rectangles (all measurements are on-loom). Draw a full-size cartoon for the decorative area that shouldn’t be wider than 4″ (mine was a simple stair step). I make my cartoons on scrap fabric or on interfacing because paper tends to rip loose when you beat. Begin at the top of the diagram. (You can also weave this from the bottom up, just reversing the inches marks.) This is plain weave, and with all wools I don’t really beat the weft, but gently snug it in so the garments feel light and airy.
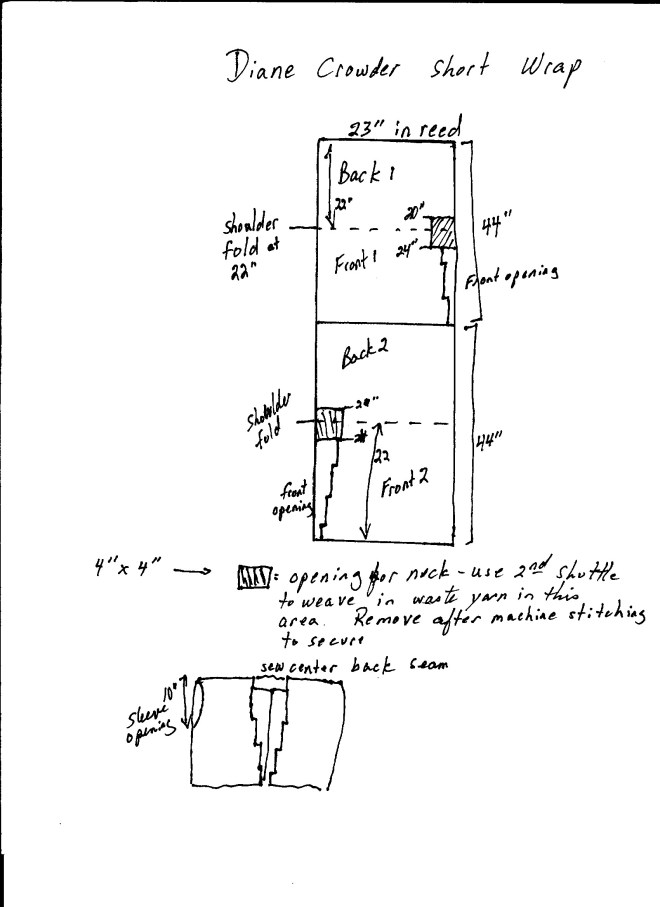
If you start weaving at the top, weave for 20″, then begin to weave the neck opening by using the main weft up to 4″ from the right selvedge, and use a second small shuttle or butterfly to weave in waste yarn or other spacer material from the selvedge to the 4″ mark. Keep weaving the neck area for 4″ (you are now at inch 24 in your weaving). Pin your cartoon for the inset accent design to the waste yarn area, weave 1 pick of main weft across from left to right selvedge and back to left selvedge. Wind a second shuttle with the accent weft and begin weaving it from the right selvedge to meet the main weft coming from the left. When the wefts meet, wrap the around, open the next shed, and return to the selvedges. Advance the cartoon as you weave. Continue until you have woven the whole 44″ back/front piece. Weave a line of waste yarn and start over doing the next piece, only making the neck at the left selvedge.
Remove from the loom, machine stitch around the edge of the neck opening, and remove the waste yarn and unused warps from that area. Machine zig-zag the edges again. Do the same for the hem edges and for the dividing line between the two rectangles and cut them apart. Wet finish. Sew the backs together at the center seam. Fold at the shoulder line and leave an opening of 10″ from the fold. Sew the side seams from there to the hem. You can make the garment rectangles 4″ longer and allow for a turned-under hem, or you can encase the raw edges with crochet or with bias binding.
Let me know if you have questions and what you think of the wrap! Happy weaving.