Hungarian reader builds rocking bench


Weaver and woodworker Zoltan Gacsi of Hungary wrote to me to clarify some points in my instructions for a home-crafted rocking weaving bench.  He built this one in only a weekend, and it is a beauty.  I especially love the curved detailing at the handles in the top of the sides.  Zoltan says the height adjustments are easy to make and it rocks very smoothly.  (Photos by Zoltan Gacsi, used by permission.)

Advertisement

Making a 3-panel Top/Dress/Coat

me&3panel3ed

I recently posted photos and weaving details for a top I made myself on the Sewing for Weavers Facebook group and a member asked for the pattern.  So far as I know, this is an old traditional design that has a couple of advantages over a traditional 2-panel (front and back) or 4-panel (two fronts, two backs) design.  To weave it, the warp is narrower than for a 2-panel and slightly wider than for a 4-panel.  The former attribute means you can use a narrower loom.  I need a 28″ weaving width for a 2-panel top in most fabrics that shrink 10-15%, whereas I only need 18″ for 3 panels.  Given loom waste of a yard per warp, those 10″ less width saves me many yards of yarn!  That is important if using an expensive yarn, or one you have a limited amount of and can’t get more.  A 4-panel design is even less wide on the loom (14″ for me) but is another panel length longer.

To design a 3 panel top, measure the front width of a non-stretchy top that fits you well.  Double that number and divide by 3.  If you don’t have a top available, measure the bust/chest size, add at least 3″ for ease, and divide that number by 3.  The result is the finished width of each panel.  To that number you need to add shrinkage (minimum 10%, more for wool or unmercerized cotton) plus 1/2″ to 1″ take-up plus seam allowances.  Since your seams will be on selvedges, 3/8″-1/2″ is enough but there will be 2 seam allowances on each panel.  Determine how long you want the top to be, add shrinkage and take-up and a hem allowance for each panel. Set up the loom to reflect the total width and length needed.  If you want sleeves, add to the warp for those.

One panel will be the front and two will be the side/back pieces.  The latter will be seamed to each side of the front and then seamed together at the center back.  This is a great design to get fancy with the front piece (inlays, etc.) but weave quickly for the other two pieces.

3-panel top

I weave the front first, since I usually plan some kind of embellishment for it, then the other two pieces without embellishment.  Of course, you can plan something fancy all over!  Put a piece of waste yarn in a contrasting color to mark the end of each panel.  Remove from loom and secure ends, wet finish.  Pull out waste yarn, and machine stitch one each side of the gap.  Cut pieces apart and zigzag or serge ends.

Sew each side/back piece to the sides of the front.  Sew the center back seam.  For a crew neck, I fold a piece of paper in half length-wise and mark off an 8″ section.  Fold that in half.  On one side, draw a semi-circle from the 8″ mark on one side to a point 3-4″ down on the fold for the front neck patter, and on the other side to a point 1 1/2-2″ down for the back neck.  Cut along the semi-circles and unfold, making it a little more curved at the ends.  Below are photos of the front and back neck patterns on my top.

3paneltop4   3paneltop3

Machine stitch around the pattern, cut, and zigzag or serge edges.  Lay top on flat surface with center front and center back aligned at both neck and hem edges.  Pin along the fold at each side from the top down to the bottom of your armhole opening. (This depends on how thick your upper arms are and whether or not you will put in sleeves.  For a sleeveless top that will drop over the shoulders for a cap sleeve I allow 10″.  More if you have large arms or plan a set-in sleeve.)  Use tailor tacks, sewing marker, or pins to mark the line you need to cut.  Sew on either side of that line, cut the line, zigzag or serge.   Bar tack across the bottom of the cut.  Note that if the armhole is too small, you can always extend it by sewing down a bit further on each side.

Refer to the sketch above.  Turn the garment inside out, pin the shoulder seams from armhole to neck edge.  IMPORTANT!  Shoulders slant down from the neck to the shoulder joint.  Begin with a 1/2″ or 5/8″ seam allowance at the neck edge, then pin it down to about 1.5″ at the shoulder edge, so that your seam slants and you don’t get “wings” on your garment.

Finish all edges.  I usually narrow hem the neck edge and sleeves, and do a regular hem at the bottom.  In the example in the picture above, I turned under neck and sleeve edges, stitched, then used the darker weft yarn to crochet the edges.

A fun and easy garment with many possible variations!  E-mail me photos if you make one.


Easy Rocking Loom Bench You Can Build

In an earlier post I advertised my loom bench for sale.  I thought it would be nice to share the plans for it.  Only basic wood-working skills and tools are needed.  Take a look at these plans and try it for yourself!  I am indebted to ReedGuy for the idea, which I have modified because I don’t have his ability to make great mortise and tenon joints!  Mine has very simple joints that only require the ability to saw a straight line.


Rocking Loom Bench

©Diane G. Crowder, 2017[1]

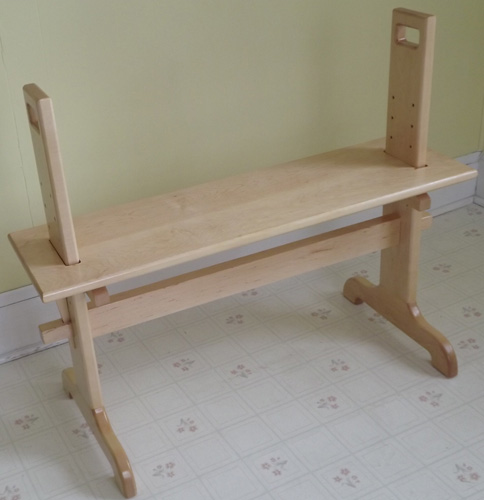
This version of a DYI rocking loom bench was inspired by the one published on Weavolution’s group Home Built Equipment by ReedGuy on Jan. 24, 2012. At the time, I was weaving a rep weave rug, and my legs were having trouble depressing the treadles with such a tight warp.  I thought the rocking motions would give more “oomph” to my treadling, so I built my bench. It worked beautifully.  It can also easily switch between rocking and flat modes of use. The major differences are (1) my version does not have the through mortise and wedge construction of the cross bar, which is beautiful but beyond the skills of many amateur woodworkers, and (2) mine has a storage bin which serves as the cross bar but adds storage. Both versions are easy to take apart for storage or moving.

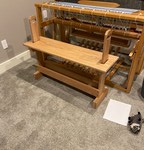
Below are photos of both benches.  ReedGuy’s is light maple, mine is walnut.

sd_bench6             KONICA MINOLTA DIGITAL CAMERA

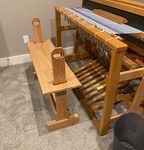
His is set in a low position, mine is set in the highest position ready to weave.  Note the squared-off tops of the legs with holes to hold/ move the bench.  That is better than my angled ends—not able to make good hand-holds.  Use his design for that.

Materials

We both used solid hard woods throughout, and I recommend that since you want a beautiful, as well as functional, piece of furniture.  Red oak is fairly inexpensive at big box home stores like Home Depot.  Other hardwoods are more expensive, but for this bench, you really don’t need a lot of big pieces.  I have had good luck going to cabinet/furniture makers and asking to look through their scrap wood piles.  Except for the top, none of the pieces of my bench are very big, and you can probably find beautiful scraps to make the rest.  Pay them something for the wood, but it won’t be much.  You can also use ¾” plywood or pine for the bench top, feet, and storage box pieces, but the legs and bench support MUST be hardwood, or the metal will wear away the wood over time and your bench will become unstable.

I am 5’6” and my loom was 40” weaving width.  Adjust the length of the bench for a narrower or wider loom, and the length of the leg pieces if you are much taller.  Here is a list of pieces. Note that the hardwood can be thicker as long as it is the same thickness for any given pair of parts.

1 bench top 9.5” wide x 35.5” long x ¾” thick

2 hardwood legs 3 ¾” wide  x 25 -35” long x ¾” thick[2]

2 hardwood bench supports 9.5” x 2.5” x ¾” thick

2 outer feet  3 ¾” wide x 9.5” long x ¾” thick

4 inner feet 3 ¾” wide x 3” long x ¾” thick

2 storage bin sides 3 ¾” wide x 26.5 up to 30” long x ¾” thick[3]

1 piece ¼” plywood for storage bin bottom to be cut to fit after dry fitting pieces (about 4.5-5” wide and 26-29” long)

Wood glue and clamps

4  ¼” hex head bolts 2” long, 4 matching wing nuts, 8 ¼” hole washers

8 1.5” #8 wood screws

Drill with 1/8” and ¼” regular bit and optional 7/8” spade or Forstner bit

Chisel or router

Saw (hand or power), and coping saw or power jig or band saw for cutting curve.

Varnish or finish of your choice

Assembly

  1. Start with the bench top and decide where you want the legs to come up through the top. ReedGuy placed his 3” in from each end, while mine are 4.5” in from each side because I wanted room to set down shuttles (which doesn’t work in rocking mode!)  Mark the center of the board at your chosen distance from the ends, then carefully measure and mark a rectangle as long as the width of your legs plus 1/8” and 7/8” wide. Use a router if you have one to make the hole.  Otherwise, use a drill and 7/8” bit to carefully remove the waste, and chisel to clean up the hole.  Sand carefully inside the holes and check to see your leg pieces come through them with a little bit of tolerance.  If you have a router, you can round over all edges including the bottom and top of the hole with a roundover bit.  Otherwise, soften the edges all around with sandpaper and work up to 220 grit sand paper on all surfaces.
  2. Next, using the same techniques, cut a hole near the top of the legs to use as a hand hold. (See photo of ReedGuy’s bench.) Do not round over legs yet, but you can round over the inside of the holes with a router.
  3. To make the bench adjustable in height, you need to drill a series of holes in both legs that must match each other exactly. The best way to do this is with a little jig made of a 2” wide piece of ¼” plywood or hardboard cut to the exact width of the legs plus ¾”.  I made the holes 2.5” apart on center. Draw a straight line on side to side on the plywood centered on the jig.  Mark across the jig at one end at the ¾” surplus edge.  Mark a vertical line across your center line 1” from the end and 1” in from the ¾” line.  If you have a drill press, use your ¼” bit to drill holes at these marks.  Nail or screw the ¾” surplus end to a little piece of ¾” scrap lumber to make an edge guide—be sure it is square to the holes line.  Here is a drawing of the jig before drilling holes.


  1. Using tape or hot glue, fasten your two legs tightly together with the ends lined up and the good faces together.  Turn this “sandwich” on its side so you are marking on the right side.  Remember the thickness of the bench top and a portion of the bench support must be taken into consideration when marking your holes.  Using a sharp pencil, carefully measure from the top of the legs down to the spot where you want the highest possible bench top to be, then do down the thickness of the top PLUS 1”.  Make your first mark there.  I used 1” increments, but you can use 1.5 or 2” increments if you like. Keep marking where you want the holes to be, down to the lowest point you think you want your bench to go (bench top 19” for ReedGuy,  15” for me) plus 1 ¾”.  If you are using a drill press, place a scrap piece of lumber on the press table, set the drill to go ¼” below the two legs, place the jig so the line on the jig matches the line on the side of the legs, and drill through both legs.  If not using a drill press, place scrap lumber on your work table and clamp the legs and scrap down so they don’t move, and drill as straight down as possible.
  2. Separate legs, and sand all surfaces up to 220 grit. Do not round over at this point.  Cut the pieces for the feet to size.  The length of the outer feet should be the same as the width of the bench top.  On the bottom of each leg, find and mark the exact center.  Do the same for the outer feet boards, marking the bottom edge.  Cover your work space with newspaper to catch drips under the feet.  Place the outer feet on the table with the outside (best) face down on the table.  Use a piece of scrap the same thickness as your feet lumber at the other end to support the leg.  Carefully line up the two marks with the outer face of the leg down, and use a square to ensure the leg is perfectly perpendicular to the foot.  Glue and clamp the legs to the outer feet.


  1. Place the 4 inner foot pieces on each side of the bottom of the leg, lining up the bottom edges with the outer foot pieces. Trim to size if necessary.  Glue and clamp with the best faces up.  Allow glue to dry overnight.  I sawed off the corners of the feet at a 45 degree angle to reduce weight. Sand feet to 220 grit. If desired, round over leg sides.


  1. Make bench support. It should be as long as the bench top is wide.  Unscrew your hole jig from the scrap of ¾” wood.  Ignoring the ¾” end, mark the center on the plywood between the holes and make a vertical line.  Choose the best face of the two support pieces and sandwich them good faces together with tape or hot glue, being sure all edges are even.  Mark a line down the exact center of the sandwich and align with the jig center so that the holes will be 1” down from the top edge of the supports.  Clamp jig to supports. Place on drill press table or work table over a sacrificial scrap to prevent tearout, and drill holes.


  1. Shape the supports for the curved rocking side. Cut a piece of paper the same size as the supports.  Fold it exactly in half and open it out to mark the center line on both sides.  Refold the paper. Before cutting, my supports were 2.5” wide.  After cutting the two ends were 1” wide.  I carefully hand-drew a curve on the folded paper, keeping it flatter in the center and  curving down to the 1” mark.  You want a nice smooth curve.  Once you are satisfied, cut the paper on your line, open it out, and tape it on the wood with the flat top on the edge where the holes are.  Trace around your curve with a sharp pencil or marker.  Use a coping saw (hand) or a jig or band saw (power) to cut just a hair outside the line on the wood sandwich.  Sand with 80 grit sandpaper to the line, then separate the two pieces and sand all surfaces to 220 grit.


  1. On inside faces of bench supports, use a drill bit the same size in diameter as the hex head of your bolts and countersink ¼” into holes. With the flat side up, insert bolts through supports from the insides and through the legs about half way up.  Put on a washer and wing nut and tighten to see if everything fits and the hex head doesn’t turn.  If it does, pull out and put a washer on the hex end and reassemble.  Slide on bench top to be sure it fits tightly but doesn’t bind.  Sand or file bench top holes if it does bind until it slides on easily.  Make sure legs are perfectly straight.  Measure length from outside face to outside face of legs to determine length of storage bin sides.


  1. Cut storage bin sides to length. Sand sides and plywood to 220 grit.  If using ¾” thick stock for legs, subtract 1 ½ “ and cut plywood piece to that length.  If you have a router, route ¼” grooves about 3/8” up from bottom edge of bin sides to hold bottom.  Cut plywood ½” wider than width of leg and insert into grooves.  Place storage bin on top of feet and align with legs.  Pre-drill holes for screws and screw storage bin to legs.  If you don’t have a router, screw bin sides to legs and measure width of bin.  Cut plywood slightly less wide than storage bin and use small screws to attach it to the bottom.


  1. Disassemble bench and finish with your choice of products. I used Minwax fast drying varnish applied with a cloth.  ReedGuy used shellac.  We both used wax, especially in the bench holes that slide over the legs.  Once dry, assemble your bench and enjoy!
  1. Feel free to use this design for yourself and to share with others (including photocopying for your guild, etc. Please do NOT publish on line or in other formats without my permission (contact me at liebcrow@earthlink.net.)

[2] This depends on your height.  ReedGuy’s bench can be set with the bench top at 29”, which means the legs are at least 35 inches for my design where the legs go down to the floor.  The highest setting on mine is 21.5” high.

[3] The actual length will be determined after you decide where to place the leg holes in the top of the bench.

Loom /Crafter’s Bench for Sale


Hand-crafted loom bench/ crafter’s bench for sale– $375

Solid walnut bench has storage bin at the bottom.  It can quickly be converted from a flat seat (configuration shown) to a rocking seat by taking out the bolts shown in the center photo and turning over the supports on each end.  The top just lifts off for easy access.  Holes down the two sides allow for height adjustments from about 15 ½” to 22” in seat height, using the same 4 bolts. Seat width between the uprights is 25” and overall width is 35 ½”.  The whole bench can be taken apart for storage or shipping.  It is a very sturdy bench and a beautiful piece of furniture.  I built it because the rocking configuration gave me extra leg leverage when weaving with more than 4 shafts on a treadle and it really helped.  My new loom is too tall for me to use this bench—otherwise I would not sell it!  Buyer can either pick it up in central Missouri (Lake of the Ozarks area) or pay actual shipping charges to destination.  Contact Diane Crowder at liebcrow@earthlink.net with questions or to purchase.  Will be available first week in February.

Save

Upcoming weaving classes

I have two upcoming classes taught in central Missouri.  Hurry and sign up now!  Here is the information.  E-mail me at liebcrow@earthlink.net or call the venue to register.

I. Frame loom weaving for beginners (and others who want to explore the possibilities of simple portable weaving).

redtap4.JPG

Two sessions Oct. 12 and 26, 9-12:30 at Lake Studio for the Arts, 16533 N. Hwy. 5, suite 201, Sunrise Beach, MO 65079. 573-317-6818.  Class is $70 for both sessions.

Materials kit is an additional $35, includes two shuttles, warp yarn, weft yarns, heddle stick, pick-up stick, tapestry needles.  Participants will get an e-mail with complete instructions for making a frame loom in advance of the workshop (all you need is a wooden picture frame and some small nails), or you can buy one at the workshop for an additional $20.

Session 1: How to warp a frame loom for weaving with a shuttle, weaving with different colors to make dots, waves, stripes, vertical stripes, clasped weft technique.  How to take weaving off the loom and finish it.

Session 2: needle weaving tapestries to make abstract designs, how to use a cartoon to make woven pictures. Display options.

II. Beyond the Basics: Embellishing Plain Weave

For Advanced  Beginner/ Intermediate Rigid heddle/ Table loom Weavers*

2-part Class: Sat. Nov. 5 10-12:30 a.m. AND    Sat. Nov. 12   10-12:30 a.m.

Class will be at Fleeces to Pieces yarn shop, where you can also register and get the materials kit. 138 W. Hwy. 54 ,Camdenton, MO 65020 (309) 838-8825.  Open Wed.-Fri. 10-6, Sat. 10-2.

$40 for Class and Materials Kit.  Materials in Kit: One skein weft yarn, pick-up stick, instructions.

Class Part 1:  We will make a 10” wide sampler hanging or table runner. If you want a table runner, you need to pick washable yarns for wefts.  Part one will include hemstitching, inlays, and pick-up techniques to create designs on plain weave. Work at home: practice making your own designs with these techniques.

Class Part 2:  Clasped wefts, supplementary wefts and warps.  Finishing techniques.

What You Need to Bring: your loom warped with #3 cotton or equivalent** — #10 heddle warped 10” wide by 3’ long (not including loom waste allowance), two or more stick shuttles at least 10” long, short lengths (a yard or so) of  several colors of yarns that contrast with your main yarn.  Also some bits and pieces of “fancy yarns” if you have any.  I will bring lots of yarns as well, paper and pencil to make inlay designs, scissors, tape measure, yarn needle, several safety pins, small crochet hook.

*You must be able to warp your loom, do plain weave, and take off the finished project.

** About 20 wraps per inch (wrap yarn snugly around a ruler for 1” and count the wraps).

Save

Long Asymmetrical Wrap Design

I have had some requests from the weaving and sewing for weavers facebook groups to explain how I make long, flowing wraps like the orange and blue ones I posted recently. I call them asymmetrical because they are longer in the back than in the front.  This creates a unique drape, as much of the fabric is now on the bias.  It literally fits almost every body, from a size 0 up to a 3X.

orangewrapdebbie3

Orange wrap

bluewrap2-16-etsy

Blue wrap


The weaving is straightforward—two rectangles.  I make them a minimum of 24” wide (on-loom) up to about 30” wide.  The sleeves on the narrower rectangle hit at about elbow length, and with the wider rectangle about wrist length.  My preferred lengths (measured on-loom) are from 60” for average height, and up to 70” for a taller person.  Any weave structure that produces a fairly lightweight fabric with a good drape will do.  I have made it in wools with a very light, open beat, but I usually use cotton, rayon, or silk.

The asymmetrical “tilted” effect is achieved by sewing the two rectangles right sides together at the back seam for 2/3rds of the length, leaving only 1/3 open at the front.  I first saw a similar design, “Hapi Wrap” by designer Trish Lange, published in the Handwoven’s Design Collection 9: No Sew Garments (Interweave Press, 1988).  Hers was shorter and not as dramatically asymmetrical, but it gave me the idea of not stopping the seam at the shoulder.  After making a few weaving 60” long rectangles (measured on-loom), I tried one 66” long and liked the effect.  The two I showed on Facebook were woven 60” long due to lack of yarn, but when I have enough yarn I prefer the 66” length.  IMPORTANT: where the center seam ends at the back of the neck, the garment will be under strain.  Be sure to reinforce this area with a bar tack (sew across the seam for about ½” on each side and back stitch) or sew by hand with the weft yarn across the seam a couple of times.

If you are short on that special yarn, you can choose to hem the garment rather than have fringes.  As the weaving plan below shows, I usually leave a 14”+ section in the middle for fringes.  This is secured by weaving in a few shots of waste yarn at the end of rectangle 1, another few shots in the middle of the fringe allowance, and more just before weaving the second rectangle.  For hemming, add 1” at the beginning and end of each rectangle for hem turn under and eliminate the fringe allowance.  I usually twist the fringes, which takes almost as long as the weaving!

After sewing the center back seam, fold the piece in half at the shoulders and sew the sides together, leaving 10” open at the shoulder for the armholes.  Twist fringes or hem. Wet finish as appropriate to the fabric.

The large open space of this garment leaves lots of room for design possibilities.  On the blue wrap, I wove a free-hand circle around the neck using a darker weft, turning each weft around the other when they meet.  It is vital to measure carefully, since ½ the circle is on each rectangle.  I started the half circle at inch 10 (front)  and finished it at inch 30 (back) .  Other garments have had an inlaid design in the center back.  I made one using Theo Moorman technique to inlay Monet-like water lily sections randomly all over a watery space-dyed warp.

monetwrap12

Homage to Monet IV: Water Lilies Wrap

Very often I make a border, by simply weaving different wefts in stripes at the beginning and end of each rectangle, as seen in the orange wrap.  Again, careful measuring is essential so the stripes will line up at the center back and side seams.

Below is a weaving plan and illustration of how it is sewn.  My drawings are not to scale and pretty amateurish, but I hope you get the idea.  Happy weaving!  If you make one of these, please send photos.

long wrap weave plan

Save

Save

My short wrap weaving instructions

My short wrap weaving instructions

Melissa Woodruff of the Facebook group Sewing for Weavers has asked about this wrap since I posted a photo of it on the group.  This is a short version of my favorite garment– a much longer wrap.  I didn’t have enough of the lovely weft yarn so decided to create a somewhat different look with a shorter warp and with fancy yarn woven into the front.

This is a “low-sew” project– only three straight seams all on selvedges, so no special treatment needed.  You can see the center back seam in the photo.  There are two side seams that aren’t visible making sleeves.  The neckline is shaped on the loom and it and the hem edges are finished with crochet.  I would have hemmed the bottom but didn’t have sufficient yarn to make it long enough.  This is a “one-size-fits-most” garment.

I used a ramie/cotton green yarn rescued from unraveling a thrift store sweater for the warp, sett at 8 epi, width in reed 23″.   (I normally make my longer wraps at least 24″ and preferably wider, but again, lack of weft yarn dictated a narrower warp.)  The main weft is Filatura di Crosa “Cambridge”, a wool/mohair blend with a nylon binder.  The accent weft is “La Bohème,” which had several colors.  I was disappointed to find it was composed of  approx. 5 yard lengths of different yarns simply knotted together, so I cut it apart to use the kind of teal-bluish color only.  The clasp is an Art Deco antique I bought at a show a long time ago.

Here is the crudely-drawn, not to scale, weaving plan.  It is woven as two 44″ rectangles (all measurements are on-loom).  Draw a full-size cartoon for the decorative area that shouldn’t be wider than 4″  (mine was a simple stair step).  I make my cartoons on scrap fabric or on interfacing because paper tends to rip loose when you beat. Begin at the top of the diagram. (You can also weave this from the bottom up, just reversing the inches marks.)  This is plain weave, and with all wools I don’t really beat the weft, but gently snug it in so the garments feel light and airy.

short wrap weave plan

If you start weaving at the top, weave for 20″, then begin to weave the neck opening by using the main weft up to 4″ from the right selvedge, and use a second small shuttle or butterfly to weave in waste yarn or other spacer material from the selvedge to the 4″ mark.  Keep weaving the neck area for 4″ (you are now at inch 24 in your weaving).  Pin your cartoon for the inset accent design to the waste yarn area, weave 1 pick of main weft across from left to right selvedge and back to left selvedge.  Wind a second shuttle with the accent weft and begin weaving it from the right selvedge to meet the main weft coming from the left.  When the wefts meet, wrap the around, open the next shed, and return to the selvedges. Advance the cartoon as you weave.   Continue until you have woven the whole 44″ back/front piece.  Weave a line of waste yarn and start over doing the next piece, only making the neck at the left selvedge.

Remove from the loom, machine stitch around the edge of the neck opening, and remove the waste yarn and unused warps from that area.  Machine zig-zag the edges again.  Do the same for the hem edges and for the dividing line between the two rectangles and cut them apart.  Wet finish.  Sew the backs together at the center seam.  Fold at the shoulder line and leave an opening of 10″ from the fold.  Sew the side seams from there to the hem.  You can make the garment rectangles 4″ longer and allow for a turned-under hem, or you can encase the raw edges with crochet or with bias binding.

Let me know if you have questions and what you think of the wrap!  Happy weaving.

New Hand Weaving Blog

New Hand Weaving Blog

I am new to blogging and suspect I will make a lot of mistakes!  I don’t plan to post very often, but I do want to share some of the things I have learned over more than 20 years of weaving.  As you can see from my “About” page, I am a retired college professor now weaving full time.  I passed the examination for the Handweavers’ Guild of America’s Certificate of Excellence in Weaving in 2012.  This self-taught rigorous exam took 4 years of research and 40 weavings in every kind of structure.  I have done several presentations to my local guild, as well as teaching classes here in central Missouri.

My plan for the blog is to post two kinds of things.  One will be my presentations on topics such as using thrums (loom waste), reading drafts, making low-sew handwoven clothing, and more.  The other will be examples of my weavings with comments on techniques, weave structures, loom shaped clothing, etc.  My hope is to share what I have learned, to inspire newer weavers, and spark sharing of ideas through your comments.

The photo above is an old one showing a ruana in both handspun and commercial yarns.  I made it when I lived in Iowa, where the warmth was very welcome in winter!

I hope to post one of my presentations soon, so check back often.  Thank you.

Diane