I have had some requests from the weaving and sewing for weavers facebook groups to explain how I make long, flowing wraps like the orange and blue ones I posted recently. I call them asymmetrical because they are longer in the back than in the front. This creates a unique drape, as much of the fabric is now on the bias. It literally fits almost every body, from a size 0 up to a 3X.

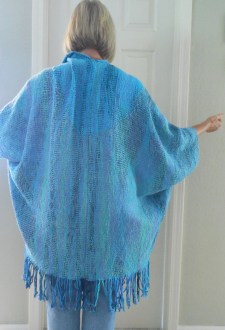
Orange wrap
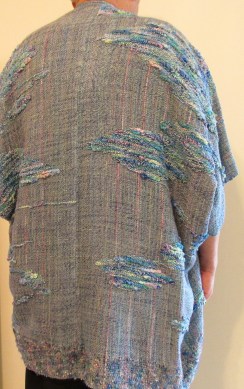
Blue wrap
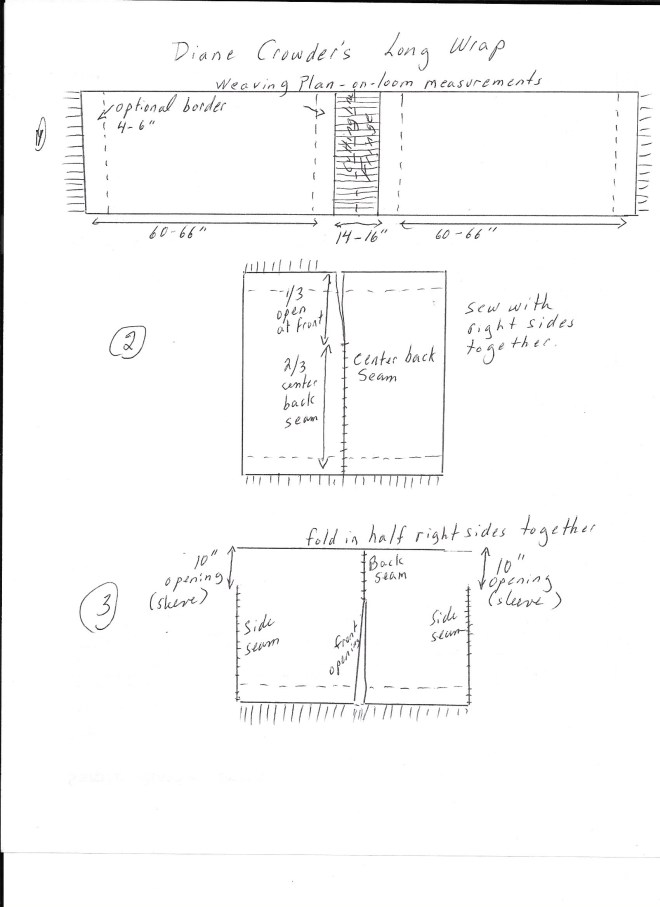
The weaving is straightforward—two rectangles. I make them a minimum of 24” wide (on-loom) up to about 30” wide. The sleeves on the narrower rectangle hit at about elbow length, and with the wider rectangle about wrist length. My preferred lengths (measured on-loom) are from 60” for average height, and up to 70” for a taller person. Any weave structure that produces a fairly lightweight fabric with a good drape will do. I have made it in wools with a very light, open beat, but I usually use cotton, rayon, or silk.
The asymmetrical “tilted” effect is achieved by sewing the two rectangles right sides together at the back seam for 2/3rds of the length, leaving only 1/3 open at the front. I first saw a similar design, “Hapi Wrap” by designer Trish Lange, published in the Handwoven’s Design Collection 9: No Sew Garments (Interweave Press, 1988). Hers was shorter and not as dramatically asymmetrical, but it gave me the idea of not stopping the seam at the shoulder. After making a few weaving 60” long rectangles (measured on-loom), I tried one 66” long and liked the effect. The two I showed on Facebook were woven 60” long due to lack of yarn, but when I have enough yarn I prefer the 66” length. IMPORTANT: where the center seam ends at the back of the neck, the garment will be under strain. Be sure to reinforce this area with a bar tack (sew across the seam for about ½” on each side and back stitch) or sew by hand with the weft yarn across the seam a couple of times.
If you are short on that special yarn, you can choose to hem the garment rather than have fringes. As the weaving plan below shows, I usually leave a 14”+ section in the middle for fringes. This is secured by weaving in a few shots of waste yarn at the end of rectangle 1, another few shots in the middle of the fringe allowance, and more just before weaving the second rectangle. For hemming, add 1” at the beginning and end of each rectangle for hem turn under and eliminate the fringe allowance. I usually twist the fringes, which takes almost as long as the weaving!
After sewing the center back seam, fold the piece in half at the shoulders and sew the sides together, leaving 10” open at the shoulder for the armholes. Twist fringes or hem. Wet finish as appropriate to the fabric.
The large open space of this garment leaves lots of room for design possibilities. On the blue wrap, I wove a free-hand circle around the neck using a darker weft, turning each weft around the other when they meet. It is vital to measure carefully, since ½ the circle is on each rectangle. I started the half circle at inch 10 (front) and finished it at inch 30 (back) . Other garments have had an inlaid design in the center back. I made one using Theo Moorman technique to inlay Monet-like water lily sections randomly all over a watery space-dyed warp.
Homage to Monet IV: Water Lilies Wrap
Very often I make a border, by simply weaving different wefts in stripes at the beginning and end of each rectangle, as seen in the orange wrap. Again, careful measuring is essential so the stripes will line up at the center back and side seams.
Below is a weaving plan and illustration of how it is sewn. My drawings are not to scale and pretty amateurish, but I hope you get the idea. Happy weaving! If you make one of these, please send photos.